


We live in a digital age and our world is increasingly moving away from paper and pens to the convenience of applying signatures via screens and technology. The process of gathering signatures is a common productivity killer -- why waste time printing and sending paper 😱contracts to your clients when you could collect a signature instantly, anytime, anywhere?!
At AdvicePay, our goal is to provide a convenient, comprehensive, and compliant solution for fee-for-service financial planning. Powered by Dropbox Sign, our eSignature integration allows you to get your client agreement signed and get paid all in one, easy workflow. Not only is our eSignature feature simple for you to send agreements, but it also makes it easier for you to onboard new clients, saving you time and simplifying the process for your clients.
With powerful new features, our eSignature integration is better than ever! Let’s take a look at our top 5 tips for using and getting the most out of our eSignature feature.
1. NEW FEATURE 🎉
Option to remove roles when sending an eSignature template!
This new eSignature feature allows you to remove role(s) from a template before it is sent! This comes in handy when you have a template with multiple signers, but would like to remove one or more without having to create a new template.
Roles can be removed on a per-document basis when sending a template. For this reason, we highly recommend creating the template to include all the possible roles that may be needed when the template is sent out.
When sending a template, advisors will now see boxes with X's in them next to the role(s). If you would like to remove a role, simply click the X!
Did you remove a signer by accident? No problem! 😊Just look for the blue Undo button at the end of the signing order and click that button. They will be added right back to the list!
Learn more about this feature here.
Enterprise users, you have additional special features to make removing roles even more customizable! This extra feature allows the Account Owner and their Admins to mark roles as Optional when sending.
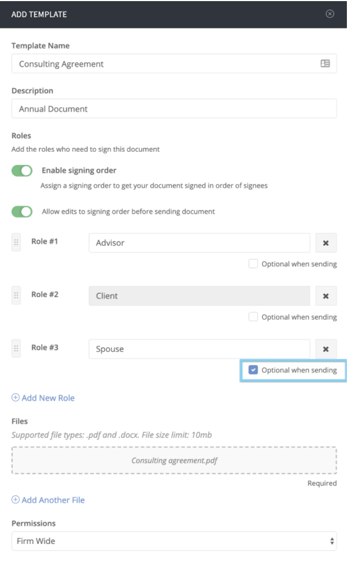
If this feature is checked during the creation of the template by the Account Owner or their Admin, Firm Advisors and/or their Admin users will be able to remove that role when sending out a document. This allows the Account Owner to have more control over which roles will be mandatory to send to and which roles their advisors can choose to be optional!
Learn more about this Enterprise feature here.
2. NEW FEATURE 🎉
Swap and replace underlying documents
Are you looking to update a document you've already uploaded into your template? This new feature allows you to quickly swap out a document and replace it with a new one!
The coolest part is that the fields that you have already created for the previous document will automatically transfer to the new one! Just remember, the number of pages in the new documents needs to be equal or greater than the original. Also, the page orientation must match the orientation of the original document as well.
All you have to do is click a template’s drop-down menu and select Edit Properties. From there, click the Replace Files button and drag and drop your new document into the Files box, or click within the box to browse for your file. Now that we launched the ability to manually enter an email address, there is more flexibility when sending a template! Not only can you manually enter an email address, the best part is the same email address can be used twice.
 Don’t forget to add more documents if you need to at this time! You can do this by clicking + Add Another File.
Tip: If there are multiple document files included in your template, you will need to re-upload all of the documents in the same order they were entered originally -- even if only one document needs to be replaced.
Once you are done, all you need to do is click Save and you will be prompted to either choose Edit Fields (where you can review and make any adjustments necessary) or Done. It's that easy!
Read more about this feature here.
3. NEW FEATURE 🎉
Manually enter an email address
Now that we launched the ability to manually enter an email address, there is more flexibility when sending a template! Not only can you manually enter an email address, the best part is the same email address can be used twice.
You let us know that some of your clients share an email address and both need to sign an agreement separately. As long as the name of the person you are entering manually is different from any other role already selected, the same email address can be used. Two separate links for each client to sign the agreement will be sent to the same email address.
Some advisors have even used this new feature to send documents to themselves first to pre-fill out the template prior to the client(s), but will also add themselves as the last signer!
Learn more about this feature here.
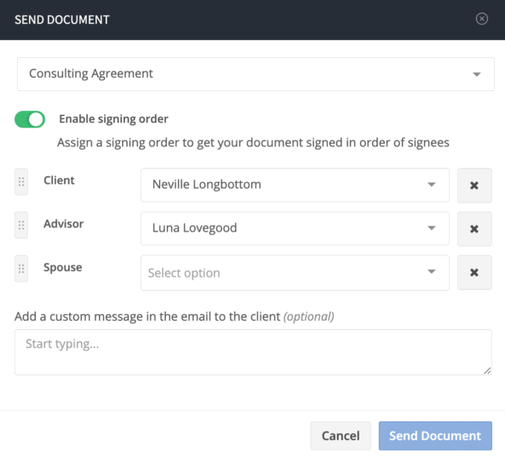
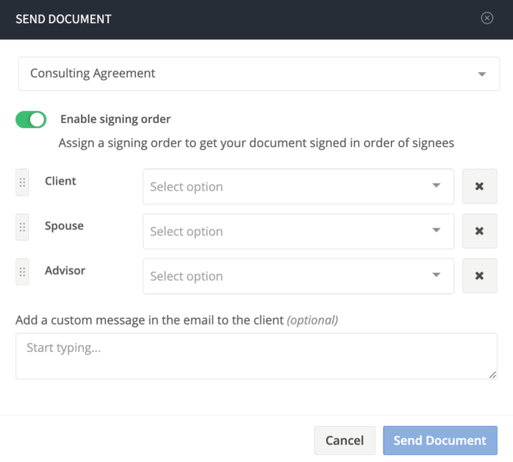
4. Signing Order
Wouldn’t it be nice to assign an order to the signees so that the agreement will be signed in that specific order? We’ve got you covered! 😀
Just toggle on the Enable signing order button and then drag any roles created up or down to create the perfect signing order. Not sure what signing order you would like for your template just yet? Just toggle on the Allow edits to signing order before sending document button and you will be given the opportunity to move any of the roles previously created in your template to a new order when the actual agreement is being sent.
If a signing order is enabled, email notifications to sign the template will be sent in order of the roles you have created. If not, email notifications to sign the template will be sent to all roles at the same time.
Are you hoping the new template would just be for you to use? Choose Only You (default) at the bottom of the add template page. Would you like for the template to be used by everyone in your office? Just choose Firm Wide instead and everyone will be able to use it.

Learn more about this feature here.
5. Auto-fill features
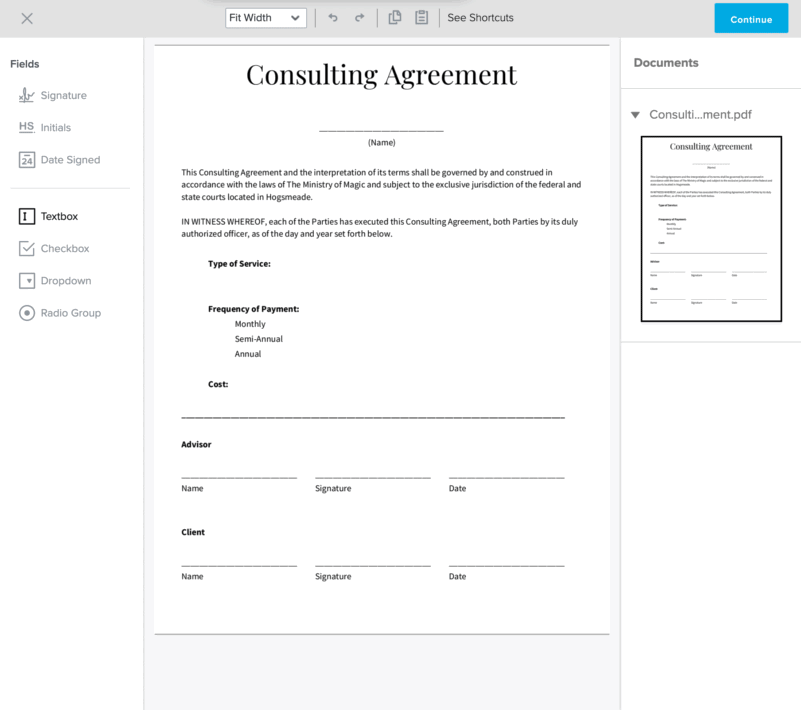
We want to make creating templates as simple as possible to save you time and stress. So, we don’t want you to miss out on one of our favorite features! When you set up fields in your template, you can have the below content auto-populate when the template is sent.
- Client Name: When sent, this will auto-populate the printed name of the signee for that role
-
Advisor Name: when sent, this will auto-populate the printed name of the client’s advisor
-
Invoice Amount: When sent with a payment request, this will auto-populate the invoice amount
- Invoice Frequency: When sent with a payment request, this will auto-populate the invoice amount
- Up-Front Invoice Amount: When sent with a payment request, this will auto-populate the upfront invoice amount for one-time invoices attached to subscriptions
How do you make the magic happen and auto-populate your template? Select the Textbox field and drag it in place in your document template. In the menu under Assigned To, select Sender. In the menu under What text goes here? select which content above you would like to auto-populate. Once the template is sent, the information will auto-populate -- it’s that simple! 👊
Learn more about this feature here.
Schedule a meeting to get personal help with your eSignature templates
Have more questions about setting up your eSignature templates? Schedule a 1:1 meeting with me!

Add the eSignature upgrade for free.
Simply log in to your AdvicePay account, navigate to Firm Settings > Billing, then click on “Enable eSignature.” eSignature is available with AdvicePay Professional and Enterprise.
Have more questions about eSignature? Check out these HelpDesk articles.

Share this

Our Top 5 eSignature Tips and Tricks

New Feature Release: eSignature Upgrades

Comments (1)